Microsoft Outlook 5 and 6 Setup Information
This document contains screenshots from Outlook Express 5.0 on Windows 98 but the setup should be identical on all Windows platforms for both versions of Outlook. Macintosh versions may vary slightly. Contact Technical Support if you have any problems or questions.
Start first by opening up Outlook Express from the icon on your desktop. Pull down the "Tools" menu and click on "Accounts". This will bring you to the following window to create a new Email profile.
Note that the first time you open Outlook Express it may automatically open the new account wizard. If it does, skip right to Step 2.

Click on the "Mail" tab on this screen, and if you are just going to use this program to check email on the Spacestar server, you can remove any other accounts that are in here; otherwise, click on the "Add" button and select "Mail" for the new addition. This will bring you to the next screen where you will add your user information for your account.

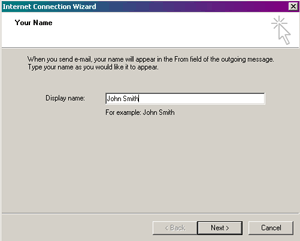
Enter the name that you would like to have appear in the "From:" heading in the Emails that you send out. In most cases, this is your real name, such as John Smith or The Smith Family. Click next to continue when you have finished this.
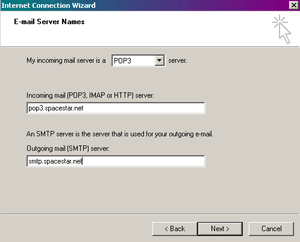
This is the point where you tell Outlook Express what mail servers to connect to when sending and receiving mail. You should enter these in lower case.
The incoming mail server type is a "POP3" server, which is the default. The incoming mail server is "pop3.spacestar.net". The outgoing or SMTP server is called "smtp.spacestar.net". Click next when you have entered these two names.
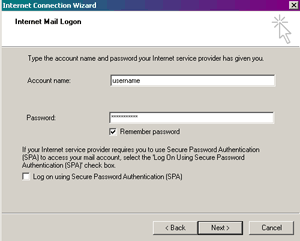
This is the last step of the setup process. It will ask you for your username and password. These two entries are case sensitive. ("USERNAME" is not the same as "username"). Be careful to enter these correctly or you will not be able to log on to the mail server. If you check "Remember Password", you will not be prompted to enter your password each time you check your mail. The bottom check box should not be checked or this will give you an error when using the mail server. Click "Next."